How an assistant writes is set in two places. The Rules tab holds the tone and the writing rules; the Assistant tab holds the signature, because a signature belongs to the mailbox rather than to one assistant.
Pick a tone
For an assistant that uses rules:
- Open the assistant and click the Rules tab.
- Find How to write. The tone chips are the starting point: Warm, Concise, direct, Formal or Match the sender.
- Click one. It saves immediately.
What each tone tells the assistant:
- Warm: short paragraphs, plain words, no exclamation marks.
- Concise, direct: lead with the answer, no preamble.
- Formal: full sentences, no contractions, no first names unless the sender used one.
- Match the sender: match the sender's tone and length.
Add writing rules
Under the tone chips, add anything the assistant should always or never do.
- Click + Add a rule in How to write.
- Type a sentence starting with Always… or Never…, for example "Always include the order number in the first line" or "Never promise a delivery date". Reads as shows it back to you.
- Click Add.
Whatever tone you pick, the assistant only states facts that are in Knowledge. If a fact is missing, it says so and holds rather than inventing an answer.
Instructions in your own words
The Instructions box on the Rules tab is for background that no rule covers: opening hours, a policy, a product name to use. Type it or click Say it instead to dictate, then click Save. The placeholder gives the idea: "For example: we are closed on public holidays."
Instructions are for how the assistant should behave. Facts customers ask about belong in Knowledge, where they are indexed and cited.
If your assistant follows written instructions
An assistant set up before rules existed has no tone chips. Its tone lives in the box How to write under Advanced on the Rules tab (How its replies are written.). You can edit and save that text directly, or click Switch to rules to move to the tone chips and writing rules described above. See “Rules: block senders and domains”.
Set the signature
- Open the Assistant tab and find Signature.
- The card shows the current signature. With none set, it says No signature, so replies end with the name and role from the mailbox card.
- Click Change signature. A signature browser opens. The names are listed on the left under Signatures, and the whole signature, as it will be sent, is shown on the right with Replies end with above it. The one in use is marked In use.
- Click a name to read that signature. Clicking only shows it; nothing changes yet. Choose No signature in the list to see what replies look like without one.
- Click Use this signature (or Use no signature) to apply the one you are looking at. A message confirms Signature updated.
- Click + New signature to create one. In the New signature window give it a Signature Name and its content, then click Create. It appears in the list.
- To remove a signature, select it and click Delete. Eloquens asks Delete this signature? and explains that any mailbox using it will end replies with the assistant's name and role instead. Click Delete signature to confirm.
- Click Done to close the browser.
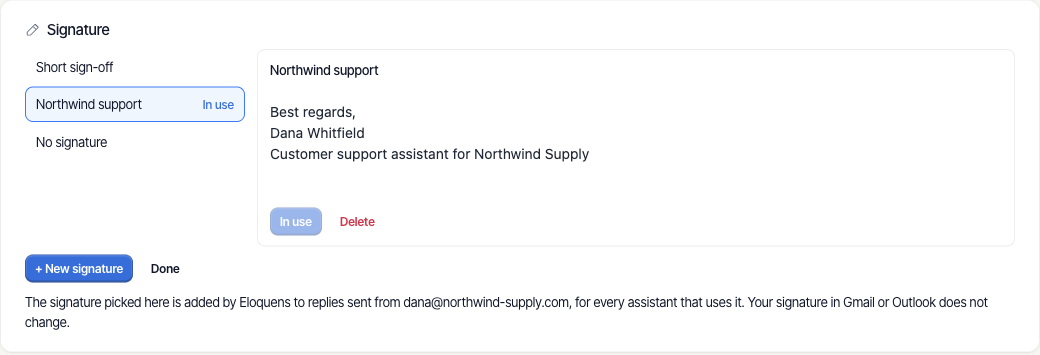
The note under the card says: The signature picked here is added by Eloquens to replies sent from the mailbox's address, for every assistant that uses it. Your signature in Gmail or Outlook does not change. Every assistant on that mailbox uses the same signature. You can also manage signatures for the whole workspace under Settings, Signatures.
Good to know
- Match the sender is the right choice for a mixed inbox where some writers are casual and others formal.
- Rules and tone compile straight into what the assistant reads; Advanced on the Rules tab shows the result.
- You can ask for tone changes in plain English: "Be more formal" in Ask assistant or Ask Eloquens switches the tone for you.
Related articles
- Rules: block senders and domains
- Edit an assistant: the four tabs
- Ask your assistant to change its own settings
Soma Konate
Comments