Creating an assistant means choosing a mailbox and telling Eloquens how to behave on it. For most mailboxes Eloquens can do the hard part itself: it reads how you already handle email and proposes the assistant for you to confirm. If guided setup is not available for your mailbox, a step-by-step wizard walks you through the same choices.
Before you start
- You need a connected email account, or the login for one. Gmail, Outlook (including Microsoft 365 shared mailboxes), Kerio Connect and IMAP mailboxes are supported. IMAP mailboxes are connected from Settings first and then appear in the inbox list.
- Decide who should be told when the assistant needs a person. You will be asked for that address.
Step 1: Start
- Click My Assistants in the left rail.
- Click Create assistant at the top right.
Step 2: Pick an inbox
The stepper at the top shows two steps, Inbox and Setup. The first screen is titled Pick an inbox.
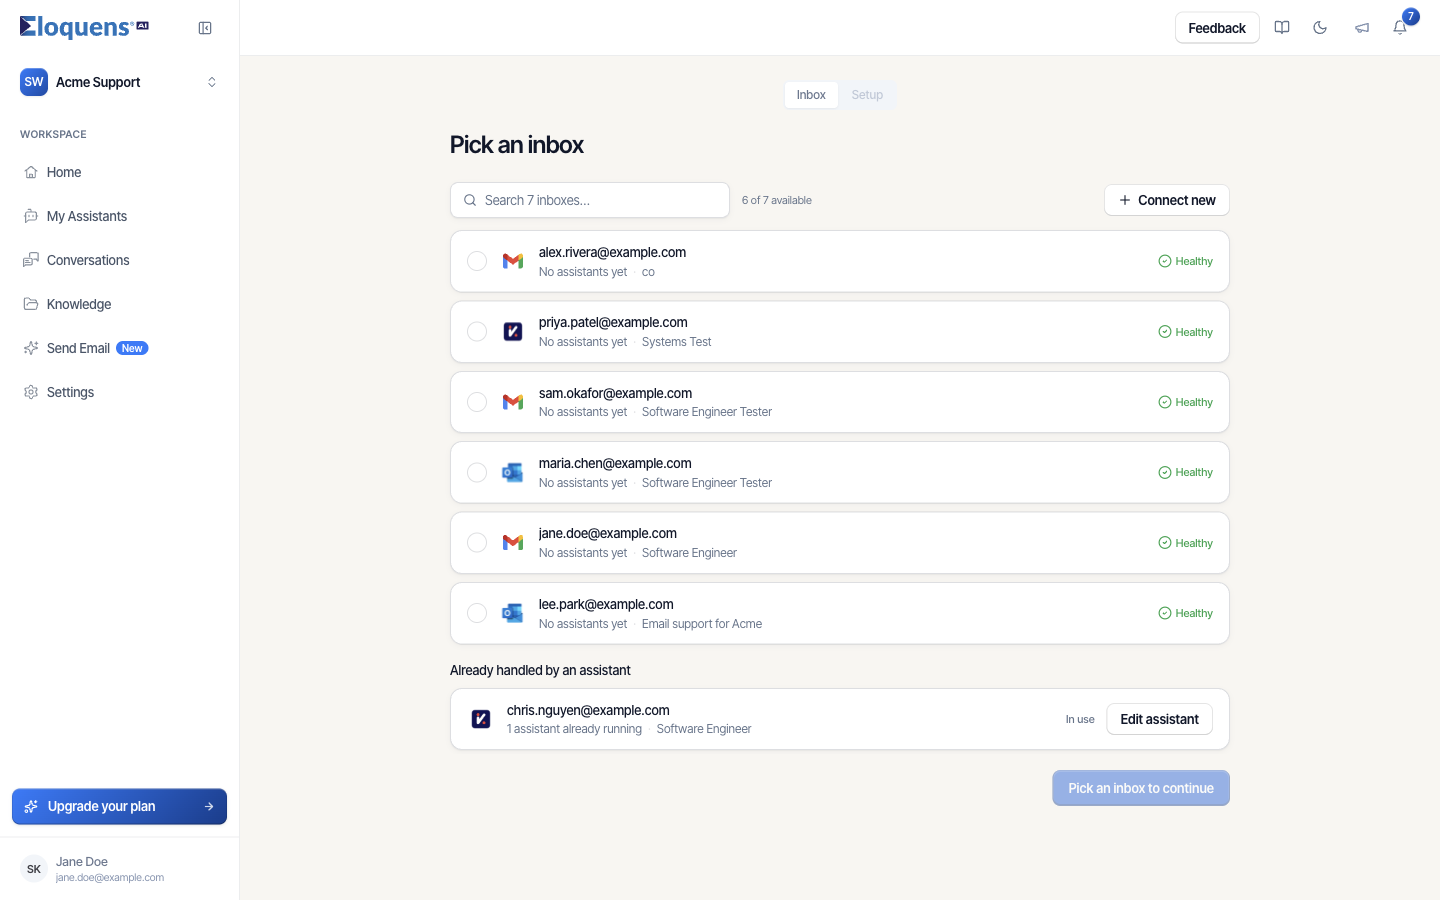
- Pick an inbox from the list. Each row shows the address, No assistants yet, the role you gave the mailbox, and a Healthy badge when its sign-in is working. Use the search box (Search N inboxes...) if the list is long.
- To use a mailbox that is not connected yet, click Connect new and sign in when the provider asks. If the account has more than one address, you are asked which one the assistant should read and reply from.
- Click Pick an inbox to continue.
An inbox under Already handled by an assistant is marked In use and cannot be picked twice; the row offers Edit assistant instead. An inbox whose sign-in has stopped working offers Reconnect.
Step 3: Guided setup (when offered)
If the mailbox qualifies, the Setup step offers to build the assistant from your inbox. Eloquens reads how you handle email and proposes the assistant for you. Nothing is sent or changed until you confirm.
- Click Build my assistant for me.
- Eloquens reads your inbox and then talks you through what it found: which kinds of mail to respond to and which to leave alone, the tone it will write in, who to bring in when something needs a person, the Knowledge it will answer from, and how replies go out (draft or send). Confirm or adjust each card. You can ask questions in the chat at any point, and See how I'd respond shows a sample reply.
- When everything is confirmed, the assistant is switched on and you land on its page.
Step 3 (alternative): The step-by-step wizard
If guided setup is not offered, the Setup step shows templates and the remaining steps: Identity, Response mode, Conditions, Configure, Test and Review.
- Setup: pick a template, for example General Inbox, Customer Service, IT & Help Desk, Sales Inquiries, HR & Recruiting, Finance & Billing, Marketing, Legal & Compliance or Start from scratch. One may carry a Recommended badge based on your inbox.
- Identity: enter the name the assistant signs replies with, its role, and the Assistant name shown in Eloquens. Pick a focus area. Under Escalation owner, enter the email of the person who should be brought in when a message needs human ownership. Optionally choose an Email signature.
- Response mode: pick Draft Mode, Intelligent Send or Auto-Send. See Response modes: Draft Mode, Intelligent Send and Auto-Send.
- Conditions (only for Intelligent Send): tick the situations where the assistant should leave a draft rather than send. AI is missing knowledge and Sensitive sentiment are on by default; Sensitive topics, VIPs and Custom rule are off until you turn them on and describe them.
- Configure: confirm each section. What to respond to and what to ignore, the tone, forwarding rules with an address for each, Knowledge sources, and continuous learning.
- Test: type a sample email and click Run test to watch the assistant handle it. Nothing is sent. Click Continue to review, or Skip test and review.
- Review: check the summary. Click Create assistant.
The toast Assistant created confirms the assistant is now active.
Step 4: Check it is on
Back on My Assistants, the new assistant's switch is on. If you would rather start paused, click the switch to turn it off; nothing is processed while it is off.
Good to know
- You can leave the wizard and come back; your progress is kept for a day on the same browser.
- Draft Mode is the safest first setting. Every reply waits for you, so you can watch the assistant for a few days before letting it send.
- Everything chosen here can be changed later on the assistant page.
Related articles
- Your assistants: what they are and how to manage them
- Response modes: Draft Mode, Intelligent Send and Auto-Send
- Edit an assistant: the four tabs
- Test an assistant before you switch it on
Soma Konate
Comments